Another Q&A on the Violectric V200 and the V800 DAC for use on IEMs.
1. For the USB input on the V800, is limited to 24/96kHz. It appears to be an add-on daughter card. In the future will you be releasing a 24/192kHz USB reciever card, and thus, can that be installed as an upgrade to the V800?
[VE] You are right, the USB input is sdituated on a daughter board and may be upgraded.
We intend to refurbish this PCB when a working 24/192 solution is deliverable. Currently it is not.
This new card will also be offered as an upgrade for existing systems.
2. Is the volume control in the V800 using the attenuation within the DAC chip? Or does it attenuate the signal after it has been processed? Where would be the best place to use the volume control? If the V800 is indeed a digital volume, then I'd assum that it'd be best to apply it there at the V800 and leave the V200 fully open?[VE] It seems that you do not share the common often reported issues on digital volume control.
For my opinion digital volume control is better than most analog solutions.
Best would be to position the volume from V200 fully open as here no channel missmatch/crosstalk issues have to be feared.
You can adjust the max. volume by operation the Pre-Gain adjstments from V200 or the max-gain adjustment from V800.
3. Using the EM4, which are 124 dB headphones, I am very concerned about noise, is this combo dead quiet?
[VE] It is !! We have several customers using In-Ears who proved that.
4. Ultimately, is it better, since my source will be a computer, to get the V200 with the 24/96 option instead? Are the DAC different? Will you be releasing a 24/192 USB module forthe V200 later?
[VE] Although the USB transceivers inside the HPAs and the DAC are equal, the overall circuitry differs much.
The USB PCB inside the HPAs offer a DAC called PCM 1793, inside V800 there is a resampling unit to completely remove jitter and a better DAC called PCM 1792.
Together with the daughter board for the DAC we will make a 24/192 board for the HPAs
Monday, 5 December 2011
Q&A for Justaudio AHA-120
Here are some questions and answers from Justin of Justaudio regarding their AHA-120 and its use with high sensitivity IEM.
[JA] Measurements are better than specification - in practice with 6dB maximum gain preset and using sensitive IEM (25ohm, 114dB/mW) noise (hiss) is only just slightly (barely) audible at 80-100% volume control position; So dominant noise will be source/mp3 player.1. How is the background noise issue? I am very concerned and sensitive to background noise, and was wondering what are the dB levels or noise?
[JA] Gain jumpers are fitted as standard now, so there is no difference in cost any more if using standard presets (6dB or 12dB).2. I saw that you do offer a lower gain version for IEM, are there any cost differences?
[JA] Very good - with new process it is possible to track within 0.5dB by grading the pots.3. With the pot on the AHA-120, what is the channel tracking like?
[JA] No plans at present.4. I read somewhere that you were going to release an IEM specific amp, is there a time frame for that, and will it be a Class A design?
Thursday, 1 December 2011
iBasso D-zero
Out of impulse today, I laid down some cash for an iBasso D-zero. I really wanted to test out how an amp and USB would perform on the iPhone and iPad, an this seemed to be one of the cheapest solutions. At the same time I got a Fiio line out I connect.
The unit itself seems to be a standard decent construction, nothin terrible or excellent. Good fit and finish. Straight up I plugged her into the iPhone with the line out and started playing music. The phones were the Ety HF5, 105 dB balanced armatures. The gain was set to low. No noise or hiss. That was a great start.
Then I proceeded to play some very familiar tracks through them. The volume control was probably set around 50% or so. First thoughts were better midrange vocals and better extension an control on the bass. That was all I had time for. Now I await the unit to be fully charged and some burning in. But I look forward to more use and integration with the iPad USB. The O2 should also arrive next week, so something to compare.
Wednesday, 30 November 2011
New Earsonics Headphone Amp
I just learned (from Earsonics) that there will be a new headphone amp being released by Earsonics, in 'a few days', designed for their IEM. With my EM4 coming, I will eagerly awaiting this product!
Thursday, 24 November 2011
Headphone Amp Ordered

- Cheap.
- Low noise.
- High measured performance.
- No time to DIY or try our more expensive options.
Tuesday, 22 November 2011
Custom IEM and Updates
Well, it has been some time since the last post, but it has been very busy and hectic lately. We have finally moved our family and settled in Hong Kong. Quite a big adventure for us, but just settling in. All my plans for the C3g headphone amp went to bits after my last post. The Yamamoto teflon sockets just arrived last week (obviously I was gone) and the luggage left no room for anything audio. The only exception was my Calyx Coffee and the Etymotic HF5.
Well, with that change of plans, and me settling in Hong Kong, I realised that full sized headphones wasn't going to work. I spend about 2 hours on the MTR system to and from work, and to date, have been using the Ety. Small, easy to fit in the pocket, and gives a decent sound with the iPhone 4. What I can say, is that the music isn't very engaging, warm and lacks a top end sparkle. But given the current situation, I'll have to make do. Or so I thought!
From setting up a full sized headphone rig with tube amp, I have now moved my focus to highest quality IEM with small solid state amps. My search for the right IEM started with the Etymotic ER4S/P. Many describe their sound as 'bland', but accurate and surgical. Probably not what I was looking for. If anything, I am trying as best to find something that has a similar sonic signature to my well used (and loved) HD650. That warm and engaging sound. Moving on from standard (or universal fit) IEM, as I did not really like the fit and feel of any of the universals that I had, I decided on a custom fit. Having read around, it seems that custom fit gives two very important advantages; better isolation and higher comfort.
Doing a quick search on Google, I found a place in Hong Kong that does custom ear mold; Phonak. After finding this, and getting my impressions for HK$800, I also found a few others that are more focused towards the audiophile custom IEM. Phonak is more a general audiologist. Having got my custom ear mold and my list down to high end custom IEM, I started to look for shops and brands. A real benefit of Hong Kong is its abundance of audio hi-fi stores. From a quick search, I found the following; Jaben, Mingo, Kingsound and Audiophysics. Audiophysics does not sell headphones, but headphone amps.
I went to Mingo after work and had a quick sessions with the iQube V1 and the Westone ES3. A few quick notes. The iQube has background noise with the ES3. Irrespective of sound, that is off the list. The ES3 has a nice balanced sound, the mids were balanced, not too forward or recessed. The bass is quite good, firm, not flabby, but not too fat. It doesn't have a huge amount of treble sparkle, but much better than the HF5.
After this visit, I did some research and narrowed my choice down to Earsonic EM4/EM3Pro and Westone ES5. This was primarily based on various Internet reviews and commentary. Doing further research, confirms that these two brands would probably be better suited to my taste then the JH or Ultimate Ears.
So long story short, I went to Jaben a few days ago, had a quick session with the Earsonics SM3, and placed an order for the EM4. Have been told up to 4 weeks for delivery of the EM4, but was suggested that this would be a lot shorter in duration. I didn't order anything special, smoke grey for the housing with black cables. Well, I am not anticipating their arrival.
The next step, a good headphone amp.
Tuesday, 25 October 2011
C3g Headphone Amp Progress


There are some time restrictions as I will be leaving shortly, and need to complete this within a few days, otherwise it will have to go in the post. Note that I am missing still the Yamamoto Loctal teflon sockets. Still, a lot of chassis work to be done, as well as testing, etc.

Friday, 30 September 2011
Some equipment Audition

- HD800 with Duson HA160D, Violectric V200 and Sugden Masterclass HA4.
- Sugden Masterclass HA4 with the T1, Ultrasone Edition 10 and Audeze LCD-2.
The easy ones first. I found both the Burson and the Violectric to be not as good as my HD650 and Elekit. The difference was in engagement and 'musicality'. The Burson had wider soundstage than the Violectric, one being beyond my ears and the latter being between my ears. The V200 sounded actually a little boring, nice sound, a little less bass than the Burson. The Burson had a very heavy stepped attenuator, which was great, except that it may clicking noises through the headphones every time I changed volume. This was quite annoying. So after around 5 minutes with each of the Burson and Violectric, I moved onto the Sugden.
Never have heard of the Sugden, but was told this was a hand-made amp in the UK. This amp is class A, and having a look through the brochure, it appears to be discrete Class A with a very laid out PCB. Anyway, the amp was cold initially and was initially connected to the HD800. This was a very nice combination. The voices and vocals were very well focused, the bass tight and the overall sonic balance and presentation was very good. I started to warm to this amp. Compare with the other two, this amp felt like it had more control over the headphones.
Over the course of the next half and hour or so, I swapped to different headphones. The first being the T1. Less bass than the HD800, different sonic presentation, a little on the neutral (maybe sterile) side. Similar to the differences I found between the HD650 and the DT880. I then tried the Edition 10. Wow, they certainly are a different sound to the rest! Light weight, well built and quite comfortable on the ear. The Edition 10 had almost overwhelming bass for me on the Sugden. It dominated the sonic presentation. The vocals had a distinct clarity/sparkle to it, that I was not used to, and perhaps I could call it 'edgy', whilst the T1 and HD800 was 'smooth'. I don't think its' a bad paid of headphones, but definitely not my cup of tea. Finally, I tried on the LCD2. Again, what a difference. Massive and heavy; quite the contrast to the Edition 10. I found that it wasn't a great match. The sound was a little flat and one dimensional. It also seemed far away, even though the soundstage was in my head. Nice balance, but probably a little weak in the bass regions.
Finally, I put the HD800 back on, and I was immediately smitten with the combo. Perhaps it was the fact that I am so used to the HD650, that the sound was so much more easy on my ears. Good balance between the lower and upper ranges. Also, the vocals didn't seem as focused or coming from a smaller source than either the T1 or the Edition 10 (which sound like a small point source). Perhaps sonically the Edition 10 and LCD-2 are very good, but for my own ears, through the Sudgen, I'd rate the HD800 the best, with the T1 second, followed by Edition 10 and LCD-2.
Coming home, I immediately turned on my current setup and listened to the same music. Though it was through a completely difference source (Mac and Calyx Coffee) into the Elekit. I'd have to say that I still prefer this setup! Even with the hum, which in contrast to the other amps, which were all dead silent. Even though this was an exercise in testing headphone amps, it appears that it may have turned out to be more of a headphone selection, and it might be worthwhile to bring my own setup to the same place and try out the HD800 and the other headphones to see how it all goes.
Hi Resolution Audio
Just a few more notes about my research into higher resolution audio than the standard 'Red Book' CD of 44.1 kHz at 16 bit. Reading a little about SACD/DSD, implies that the maximum possible with that format is around 20 bits, 96 kHz. But given my desire to run everything from the computer, means it is not really part of my audio landscape. Looking at a few HD audio websites, primarily HD Tracks, appears that 96 kHz at 24 bit is readily available. There was limited offerings at 24 bit 192 kHz. However, the range of music available is still limited, and only a few of the artists that I like to listen to are available. It would be interesting to see if the 192/24 becomes more readily available with a larger selection of artists, otherwise, it would seem moot at this point in time, to invest in hardware and tracks in this much higher resolution.
Again, my choice in the Calyx Coffee, which is limited to 96/24 would be a good choice for the short and perhaps medium term. The next step is to make available some of this high resolution tracks, and compare that against the standard Red Book versions.
The other question of over sampling is coming up. I am pretty sure that the Calyx oversamples 44.1/16 into its native resolution, due to the Block diagram with a component "Oversampling Filter". This would suggest that whatever sampling frequency is fed into the DAC, is samples it into its native frequency. Which I would presum is 96 kHZ. Again, going back to various historical threads, people seem to say a lot of positive things about Non oversampled DAC. Perhaps this is an area to do some more reading on.
Another reason why I chose the Calyx is because it used an ESS chip. As I have a full Twisted Pear Audio kit for the Buffalo II (using the ESS9018) along with the Legato and relevant PSU, I'd like to sample the audio signature of the ESS chips before I embark on the build. Given my limited time and space, I'd like to know whether this is something that I can live with, or live without. Hopefully, I can get a decent session tonight, and provide some more thoughts.
Thursday, 29 September 2011
Updates and Digital Audio
It has been an awful long time since my last post; but things have been pretty hectic of late. Primarily is our decision to relocate our family to another country, which will be taking place within a few months. This event, along side other life things, has meant very little, if any, time to blog. At the moment, I barely get any good audio sessions in...
In light of the relocation, this has spurred me to look into portable solutions. Having a good assortment of headphones already is a good start, but this has forced me to look into the weakest part of the chain. At present, all my music is run through iTunes (AAC Lossless) and played to the headphone amps via the standard audio out on my Mac Pro or Macbook Pro. Note an ideal solution. This then started to get me looking into improving the digital connection between the computer and the amp.
Welcome to the world of USB Audio... Initially, there were a catch up in the USB Audio technology. The way I understand it is, there is USB Audio 1 and USB Audio 2. USBA-1 only allows for 48kHz/16 bit. But the newer standard of USBA-2, can support high sampling and bit depth. The highest I have seen so far is 384kHz/32 bit. However USB1.1 can support stereo 96kHz/24 bit in terms of its band width, and USB2 can obviously go higher. On top of this limitation are the limitations in drivers in the various OS. Add further to this is whether or not the USB device is asynchronous or not. More technical terms and more technical information to digest.
The long and short of it, I decided that the best place to start would be a USB device that had RCA outputs that can handle up to 96kHz/24 bit. And in this market, there was plenty of choice. Being able to handle the higher resolution allows me to explore HD audio tracks, which would not be possible had I stuck with something simplier with only 44/48kHz at 16 bit. Through the various web pages, etc, I was able to gleem that there was an awful lot of South Korean and Scandanvian companies making USB audio devices. Alongside that, the standard Chinese offerings and others from US and Germany. Some of the companies that I came across includes: Calyx, Bel Canto, M2Tech, Lead Audio, Lindemann, HRT, April Music, Anedio, Bladeius, CEntrance, SoTM, Halide Design and a few otherse. Where possible, I tried to avoid the Chinese companies. When I get the change, I hope to write some notes about the various units that I looked at over the last few weeks.

Again, without boring everyone, I settled on a Calyx Coffee. An asynchronous 96kHz/24 bit USD DAC using a lower version of the ESS DAC Chips the ESS9023. I chose this because it was relatively good price (middle of the pack), had the ESS DAC chip, looked good and has external control buttons. This was brought from Wicked Digital and the unit arrived yesterday, and has started the burning in process. The main difference I can see from this chip and the top of the line ESS9018 is that it only has 1 DAC circuit for each channel (whereas the 9018 has 8 circuits that can be customised in various configurations) and it also has voltage output (as opposed to current output).
Well, hopefully, I can provide more insight into this DAC, which is currently hooked up to the Elekit and HD650.
Wednesday, 27 July 2011
Updates
It has been a long time, but between work, unpacking and family, it has been hard to find the time to blog. I recently purchased a pair of Etymotic hf5 from Headphonic here in WA. Very pleasant experience and good price. It arrive to me in Melbourne on Wednesday morning, after ordering on Sunday evening. I am now listening to them at work, and the sealing is very impressive. I can't hear any of the basic office noises around me, including my own typing, etc. Not much to say about the sound yet, got to give them a least 20 hours of burn in. But at the moment, it sounds pretty balanced in its presentation, but a little lacking on the highs. Again, not enough time to write more or to try out new things. But hopefully in the coming months, I can get back onto some consistent blogging.
Tuesday, 5 July 2011
Updates and WE396a Tubes Arrived!
After a few weeks of moving and settling in, I am not somewhat settled. Listening to the TU882R with the WE396a tubes right now. It is a good feeling to be mostly unpacked and most things setup. It is quite relaxing indeed. Anyway, in the last few weeks two notable events took place. Firstly, my order of 3 pairs of 396A tubes have arrived from Audio Tubes. I purchased from Brent;
- WE marked WE396a tubes.
- National marked WE made 396a tubes.
- United marked and United made (in the UK) 5670 tubes.
They did attract a premium, being WE produced tubes and UK made tubes. I hope to get some photos up of these tubes, along with my three other types of 5670 tubes, once I find some space. It'd be good to do a sonic comparison of these tubes later on.
The second item of note was my ordering of the Jordan JX92s MLTL kit from Decibel Hifi. They also arrived quite promptly from Brian in Queensland. I must say that they were a lot smaller then I thought they'd be, but nonetheless, still sizeable. From initial impression, the fit is good, and being MDF, should be easy to finish. Along with this order, I also put in for a set of 4 Eichmann Silver Bullet plugs. This is to connect the various computer output and DAC to the standard amps with use the RCA. As some long time readers will know, I prefer to use the XLR style connectors. But, when dealing with kits, inevitably, they are all RCA connections.
Anyway, back on track, I hope to be able to put these together in a few weeks. With a proper sized TV/main room, I am excited to see the JX92s perform. I plan to dress these up a little with some hardwood cladding over the MDF. This will both function as aesthetic, as well as adding additional stiffening and allowing me to fix some speaker cloth to it, to protect against the young ones. Again, long time readers can see my Fostex MLTL towers... Finally, regarding the Fostex, I plan to revive them by turning them around and adding a Speakcon on the current front side, and turning the 2 sets of binding posts into a hole for the vent.
Lots to happen in the next few weeks, and now with a decent space to do some wood working, and space to place and use the speakers, I hope to be catching up with all the various speaker builds that have lay in abeyance in the last year or so.
Sunday, 19 June 2011
TU882 and the DT880
Again, I found an excuse in my packing to swap the headphones, from the Sennheiser HD650 to the Beyerdynamic DT880 (600 ohm version). The first thing I noticed was that there was no noise at all. No hum. Virtually silent. Very promising indeed. Listening to my standard favourite/test set of music, there were a number of differences between the Senns and the Beyers.
The bass is more present (i.e., louder) and rich with the Senns. The Beyer, they feel more articulate, but less in your face. Far more restrained on the Beyers, where on the Senns they feel like it has been let loose a little. The presentation of the Beyers was less warm than the Senns, and a little more clinical. The voices on the Beyer is more refined, but lack the lushness, similar as well with guitar strumming, the Beyers are precise, but lack that slight indulgence that makes it full and warm. Overall, the balance favours the mids and probably overall a little more balanced than the 650's, though probably a little shy in the bass region. I would regard the Beyers DT-880 as more precise, controlled and pristine. Whereas, I would describe the HD-650 as warm, natural and lush. Obviously very vague terms, which are highly subjective, not only to me, but between different sessions, moods, etc.
The above observations were made between two sessions, over two consecutive evenings at around the same time. The setup was identical except for the headphones, and it was the Elekit TU-882R with the Western Electric 396a (with around 20 hours on them thus far). The volume control was different by around 2 to 4 'hours' relative to each other.
Saturday, 18 June 2011
C3g Headphone Idea

Thursday, 16 June 2011
More thoughts on the TU882R
Just having a lovely session with the TU882R and the HD650 right now. They WE396a tubes are in, and has been warmed up for over half an hour. Just a casual, easy listening session now, with Missy Higgins, Crowded House and Coldplay. A very nice way to end the day...
I am now trying the HD650 with the Medium impedance switch. The hum is now gone, and the amp is dead silent. According to the manual, this impedance setting is for 20 to 100 ohm headphones. However, I am trying to discern if there are any sonic differences between the two settings, apart from the hum. First impression is that the sound isn't as dynamic or lively. It is a little more laid back and somewhat 'lazy'. The bass isn't as well controlled or present either.
Well, after the recent experience with the WE tubes, I decided to order three more pairs of the 5670/396a from Brent at Audio Tubes. As usual, all my previous experiences with Brent has been excellent, and this time around, it was no different. He offered a good deal when I purchased three pairs; Western Electric 396a, WE made 396A for National and a British pair labelled 'National'. I have always had good experiences with British made tubes, the 12AE6A Brimars being a prime example, and thought that they could be a good counterpoint comparison with the others. Well, I hope to receive them in the next few weeks or so, and start to enjoy their different sonics.
As I am writing this, I am definitely preferring the high impedance tap, even though there is the hum in the background. It just mates so much better with the HD650. Well, more testing to come.
I have recently noticed that some of my music has very strong super stereo effect, where music is coming out of one side only. I do find this a little distracting at times, and started to look into placing a crossfeed. I installed with in my Mini Max Millett but never used it, cause it didn't sound right. On review of the setup, I think I might have wired it incorrectly. The next step is to remove it from the amp itself, and create myself a little stand alone box to house the crossfeed. This might make it easier to compare the effect and see whether it is right for me. Anyway, more to come later.
Monday, 13 June 2011
WE Strikes!
The thing was, as I was starting to pack up the stuff ready for the move, I was in the room with all my headphone gear, and decided that it was best to do all the packing with the headphones on. As such, I thought, why not try the Elekit for the next week. So, out with the Crack, and in with the TU882. And the first thing I noticed was that the hum was not as loud as before (or so I thought), but it was definitely lower than the Crack that I just unplugged. That is the good news. The bad news was, I was using a pair of Raytheon 2C51 and I just wasn't all that endearing, the sound that is. So, I thought, I might spend a few minutes to change out the Raytheon and put in a pair of WE396a that I had purchased. Firstly, it was very soft on the right ear, almost no sound. My heart sank....
Was it the amp, or the new tubes? No idea. But as the amp got warmed up, slowly, the volume on the right side picked up and now it settled in to match the left. A sigh of relief. But boy, only the first hour of music, and the sound is so much better! So much so, I am thinking I need to get me more of the Western Electric NOS. Another thing I noticed was that the hum levels was actually less than the Raytheon tubes (this is going by memory...). But, it is now very quiet. Not dead silent, but very quiet. Not as quiet as the Ear, but close. Regardless, the sound was so much improved, it makes me really want to keep listening to this setup.
Anyway, a moment of revelation, and onto the shopping!
Saturday, 11 June 2011
Crack and Speedball Up and Running!
 Finally put the replacement parts into the C4S board this morning. See the photos below. The rebuild itself was very quick, only 5 components to solder and 3 wires to reconnect. After doing a few visual checks to make sure everything was in order, I fired her up. And yes, it worked! No problems this time. Equal volume on both sides, and all LED lighting up as they should. Now this amp has been fixed, I now have four fully working headphone amps; the Crack, TU882R, Ear+ and the MiniMax Millet. I'd have to say that the sound stage is a lot more compressed then what I remembered last time I was listening to this amp. I am using the stock tubes supplied by Bottlehead, which is a Philips ECG 6080WC and (I think) a Sylvania 12AU7.
 An initial observation about the floor noise of the Crack. There is a hum, but given it is AC filaments, it could be from that source, but it could also be from the B+, who knows. I would have to say that it is not as loud or obvious as the hum on the Elekit, but this is just anecdotal observation, as the last time I listened to the Elekit was a few weeks ago. Again, the Ear+ doesn't have this problem, but that is DC filaments. Could it be from the B+? The Crack has CRCRC filtering. The Ear has CRC for the output tube, and an additional RC stage for the driver tube. The Elekit has cap input, followed by a FET, which I can only presume is acting as some kind of series regulator.
  Well, moving house very soon, and all of this needs to be packed up and transported. However, the beauty of the headphone amp and system, is that they are so portable, and can be one of the last things packed, and the first items unpacked. I think in the coming months, I'd have a good opportunity to start some comparisons between the three amps.
Saturday, 4 June 2011
Repair of the Crack/Speedball
Finally got around to removing the board that was damaged due to my own fault. See the photos below. You can see a very small hole in the small blue resistor 237R. It measures over 4k now. One of the diodes also do not bias up at 1.4V. All parts removed and the through holes cleaned. I accidentally ordered the 2N2907 and 2N2222, rather than the "A" versions. Now, I have ordered the correct ones, and also a replacement 237R resistor. Should all arrive by next weekend, in time for re-installation.


Tuesday, 31 May 2011
Comparison of Noise
After been not satisfied with the low hum levels, I decided to plug back my Maple Tree Audio Ear, and low and behold, even more noise! I didn't remember that at all. But, I remembered that my son accidentally touched the driver tube, so I decided to give it a gentle jiggle, and noise gone. Obviously a dodgy connector, dirty or something along those lines. But yes, there is no noise in that amp at all. Admittably the Elekit's hum was very soft, but in my current home, the ambient noise levels are very low almost all the time, so the noise is a bit more audible. However, the Ear was built over five years ago, with similar spec'd components, and it is, noise or hum free. I think there might be another problem in my wiring or placement of components in the Elekit.
Going through this exercise has spurred me onto completing the D3a amp and the Aikido headphone amp. But due to the imminent house move, they will all have to wait until I unpack at the new home. At least I have three (!) working headphone amps. I still haven't got around to fixing the Crack just yet.
Going through this exercise has spurred me onto completing the D3a amp and the Aikido headphone amp. But due to the imminent house move, they will all have to wait until I unpack at the new home. At least I have three (!) working headphone amps. I still haven't got around to fixing the Crack just yet.
Sunday, 29 May 2011
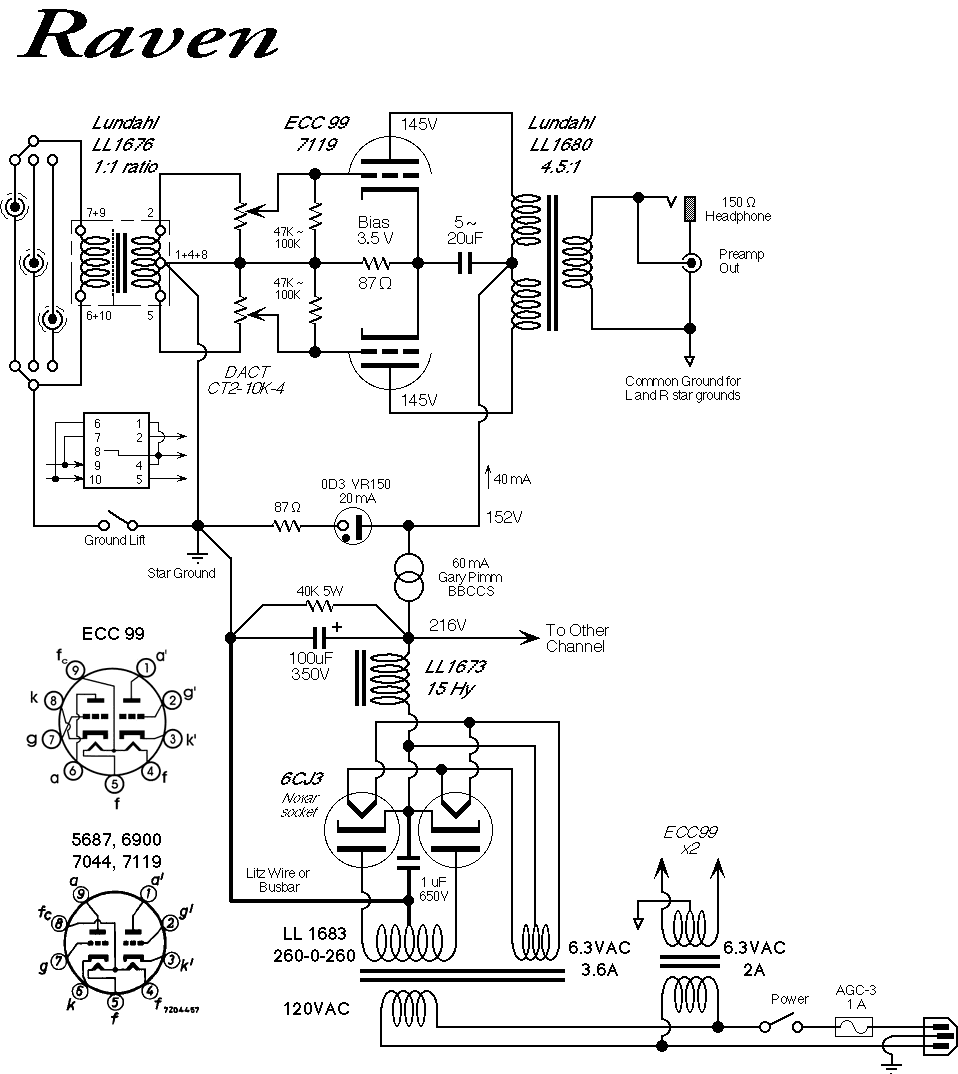
Confirmation from Sowter
Here is confirmation from Brian Sowter that their attenuators cannot be used as unbalanced to balanced convertors. The email snippet for your information.
From Brian:
"You cannot use one of our transformer attenuators as a phase splitter. 3575 could be used following the attenuator but our type 1125 has full geometric balance and would be more accurate than any non transformer method."
To my question:
"I am planning to build the Raven and was wanting to use the 9985 as both a phase splitter and an attenuator instead of the transformer phase splitter currently recommended (either a 3575 (which I have) or the LL1676).
Can you confirm that the 9985 is suitable as a phase splitter as well, and with excellent imbalance."
From Brian:
"You cannot use one of our transformer attenuators as a phase splitter. 3575 could be used following the attenuator but our type 1125 has full geometric balance and would be more accurate than any non transformer method."
To my question:
"I am planning to build the Raven and was wanting to use the 9985 as both a phase splitter and an attenuator instead of the transformer phase splitter currently recommended (either a 3575 (which I have) or the LL1676).
Thursday, 26 May 2011
More info on the Raven
Found this thread over at Audio Asylum regarding the Raven, and I put here Gary Dahl's comment:
"I would suggest a Raven MkII with S&B TX-102 transformer volume controls at the input. Circuit diagram is at the link below, with the following updates/exceptions:
1. Omit the DACT CT2-10K-4
2. Replace LL1676 with Sowter 3575
3. Install TX -102's at input, ahead of Sowter 3575's.
4. Omit grid resistors."
Also noted that the LL1680 doesn't come in a Amorphous core version, but I should be able to use the LL1689 as it has the same windings, though it doesn't seem to be a dual coil. Too bad the LL1689AM that I have on hand, is gapped for SE. With the above suggestions, it is even better for me, as I have a pair of Sowter 3575 that isn't actively used in my early Millett Uniamp builld. But it'd be worthwhile to explore using Sowter's other TVC like 9985, which has balance controls as well.
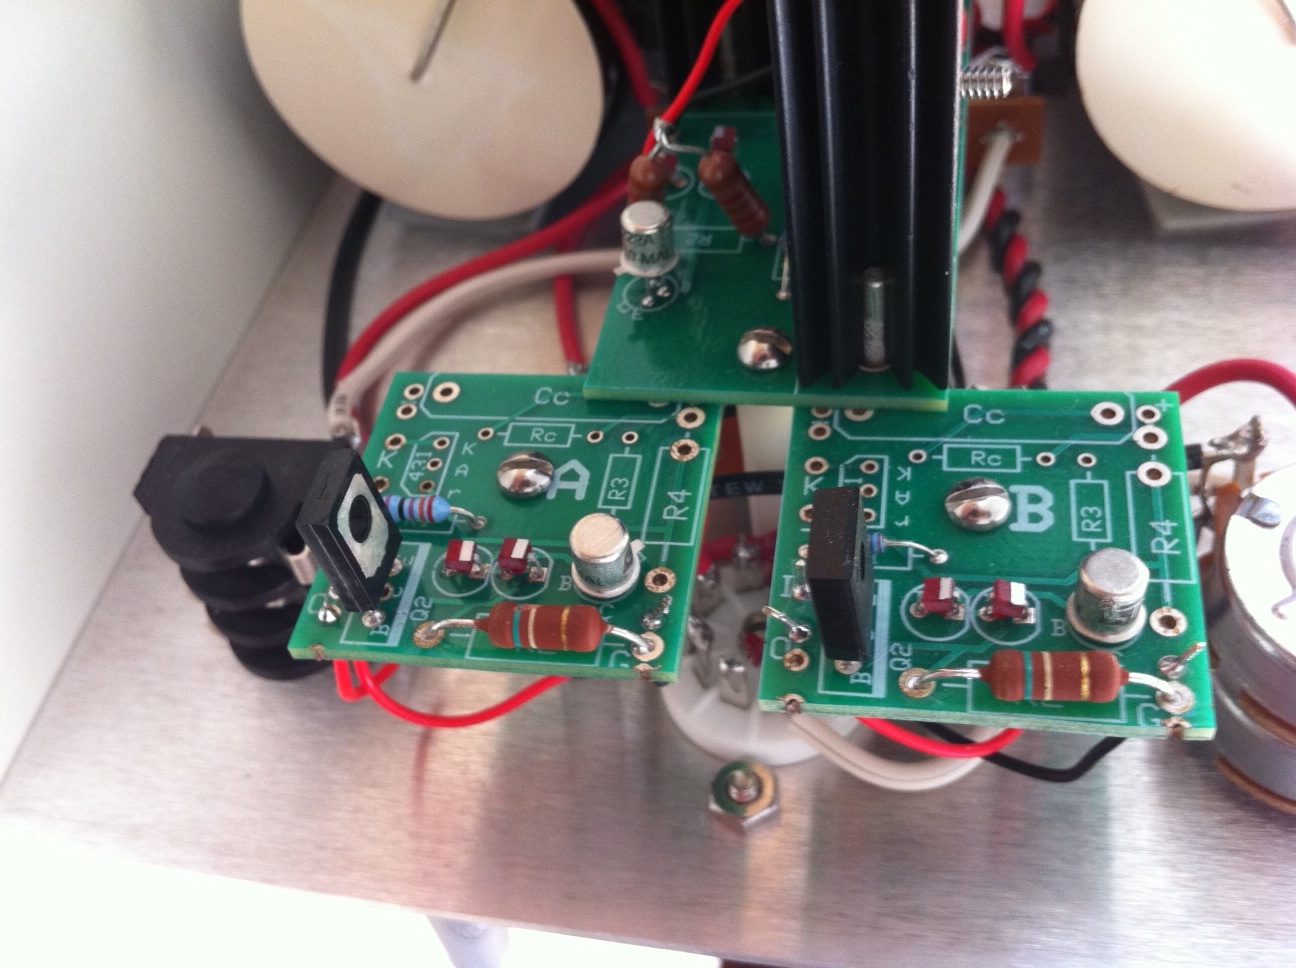
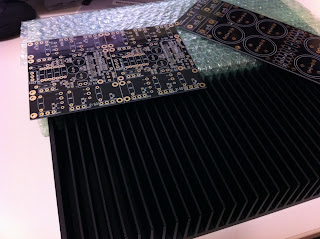
Synergy between Headphone amp and F4 amp
After some more thought, it seems that there is great synergy between headphone amps and the F4 amp. In as much as, I can use all my headphone amps as the front end to the F4. In a simple way, once the F4 is built, each and every headphone amp also becomes a speaker amp. Of course, this is provided that they can output enough volts to drive the speakers. Looking through the F4 manual, the amp needs to out 10V swing or more (around 7 Vrms), with around 12 dB of gain, and moving towards 14V (10 Vrms) and 20 dB for lower efficiency speakers.
This then led me down a path of potentially exploring an even more extreme headphone amp - the Raven. This design is a fully differential single stage using shunt voltage regulation. The PSU is very similar to my D3a concept, and could be inter-changed. The prime difference is the current loading, the Raven requires 60mA per channel. However, with the higher spec'd chokes on hand, that may not be a problem.
This is something for me to consider as I embark on the D3a build. If I could make it modular enough, in terms of the PSU, then I could power the Raven with the same PSU unit. However, the primary cost of the Raven are the input and output transformers, and if I go for all Amorphous cost, the total cost would be around AU$1,000. A very tempting option indeed.
Saturday, 21 May 2011
Elekit TU-882R Completed!


Wednesday, 18 May 2011
PSU Rectifier PCB Board
Having looked extensively at the the Aleph 30 and the F4 builds, I have decided to create my own rectifier PCB board. This is both an exercise of interest (to design and create PCB boards) and practical, for use in my amps. The basic premise will be:
- Full Wave or Bridge Mode.
- Discrete TO-220 Diodes with Heatsinks.
- Snubber across the diodes.
- Inclusion of a mains line filter.
- Flexible enough for use either in dual +/- low voltage supplies and for tube B+.
This PCB will allow the easy connection of the transformer secondaries on one side, and for connection to the cap or choke input filter.
Tuesday, 17 May 2011
Some more Pass Labs Build Links
Some more pages with great information on various Pass Labs projects:
- Aleph-X 100W
- Aleph 2
- Pass Labs A40
- Aleph X (PDF File)
Monday, 16 May 2011
F5 Build Guide
Great thread at DIY Audio that documents the construction of the F5. It would be great if I could do something similar for the Aleph and F4 build.
Wednesday, 11 May 2011
F4 Capacitors
Having reviewed the various options for the PSU capacitors around, I have decided to use either the Nichicon KG series (maybe Super Through), or the DNM T-Network capacitor (also here). In either instance, stick to a 10,000uF single for the first capacitor stage, followed by 2x 10,000 uF in the second capacitor, after the choke. I will aim to bypass the final stage with a low value, high quality 0.1~0.47 uF film capacitor. Maybe a Russian Teflon, or a paper in oil type. For safety, will be using 63V or higher voltage ratings.
Finally, having reviewed how the F4 will be used, I no longer need to have a separate PSU supply for each channel, which reduces the cost and number of parts significantly. So in the above example, I'd be using 6 caps per F4, and I will need 12 in total, plus 4 film by-pass caps.
Not sure if the above will work with the Chipamp PCB, as there are different cap positions. Also the KG don't all come in a snap-in PCB mount, actually, they are mostly in a termainl mount. However, the T-Network seems to have the right hole arrangements. Anyway, given I am moving house soon, all of this will have to be put on hold for at least 2 months until I settle in.
Monday, 9 May 2011
Heatsinks!

Had the opportunity to go down to Conrad Heatsinks today and pick up a pair of these puppies. Gee, they are big. 350x150mm in size. They are the MF35-151.5 and are rated at 0.21 C per watt for 80 C rise and weigh in at 2.46 kg each. See the Aleph PCB for size comparison. The guy was very nice and gave a good price to pick up and pay on the spot. These will be definitely in contention for the F4 build.
What to pair with the F4
The question of what to pair with the F4 current buffers is an important question that was asked in a forum, and I think it deserves some time to review. Currently, the best candidate would be the 45 DRD build. With a specified output of around 1 to 2W, makes a perfect candidate for F4. I also have a 16 ohm tap, which should ensure that there is sufficient voltage to swing the F4. In this configuration, I can be using a pair of F4 per channel to buffer both the HF and LF drivers. This frees up the choices available for either, as the speaker efficiency is not too critical.
On the other hand, I could attempt to mate it with my plethora of headphone amps, which in and of itself, would make an excellent experiment. That is, comparing different headphone amps on both speakers and headphones. And finally, I have an Aikido line stage sitting in parts, and that could itself also be a good front end. Either way, I think the flexibility that the F4 offers is great, and allows me to mix, match and experiment with different combinations.
Extending the notion of boosting a flea power amp, the F4 allows one to experiment with medium mu DHT or single stage DHT amps. Using something like a 30, with a mu of around 9 or a 01A, 26 or 10 with a mu of 8. There are so many possibilities...
Saturday, 7 May 2011
Aleph 30
 One of the projects that has been sitting on the shelf for some time has been the Aleph 30. I originally got the PCB from Chipamps about two years ago, and got most of the parts a year ago. Recently, due to my interest in the F4 amp, I decided it was time to finish this project sooner, rather than later. To that end, I purchased a Torodial transformer from Tortech, a 300VA dual 18V type. The only parts needed to complete this is a chassis and the heatsinks.
 Regarding the heat sink issue, I have been exploring various options in my mind. Using the standard off the shelf heat sinks from someone like a Conrad Heatsink. Another option floating around is using heavy weight structural steel sections. I was thinking a 380PFC section cut to around 300mm in length. This would also form part of the top chassis. It weighs around 55.2 kg per meter, so a 300mm section would weight about 16.56 kg. Plenty of mild steel mass to sink the heat. But not sure if this would be a good thermal solution. More experimentation to come.
Thursday, 5 May 2011
F4 PCB and some Parts

They have arrived. The 4 sets of PCB and the active parts for the F4 amp. The cost, US$126 for the semiconductor kits from Tech DIY and US$77.95 both including postage to Australia. Looking forward to getting the rest of the parts!
Tuesday, 3 May 2011
More F4 parts and update on TU882 Kit
Having looked around at the different suppliers and options for the source resistors for the F4, I think that the Mills MRA5 0R47 option would be the best. The Caddock MP915 requires a heat sink, and their other range of higher power resistors that do not require heat sinking, like the MV261 series are not easily found. Having made a personal note to avoid Parts Connexion, I have sourced Michael Percy for them, and will put together an order, along with the Nichicon KG that they stock.
Other information of note. The transformer selection for 2 channels of the F4 requires a minimum 300VA transformer, with two 18V secondaries. In my design, since each channel gets its own PSU, I will aim use a 250VA to 300VA transformer per channel. This should provide adequate headroom and maybe keep the load lighter, and thus the core cooler. From this, I can deduct 5A rated choke should be adequate, one for each of the positive and negative rails, instead of the parallel 0R47 resistors. The Hammond 159ZJ should do nicely. Now I need to get four of them. It also appears that amps with large farads of filtering capacitors may have a problem with the power on thump. So I will look into a soft start arrangement, and try to keep that to the primary side of the transformer.
I also contacted Victor about the hum and noise issue, and he suggested that I revert the amp back to the standard configuration, using the supplied pot and PCB to see if this problem can be removed. Smart idea. I will do that when I get the chance.
Sunday, 1 May 2011
F4 Parts Sourcing
Currently looking around for the parts for the two F4 amps that I have on my mind. With the active devices already purchased, the choice is now narrowing for the remainder of the passives. I have elected to purchased 4x PSU PCB from Brian at Chip Amp as it allows a fairly straight forward build. I have use his kits in the past, quality and service is very good. The main question is how much to budget for this build. With the use of high quality resistors and capacitors, the passives alone for a 4 channel build will be close to the US$1,000 mark. The thought of diminishing returns start to play a part here.
PSU:
- Rectifiers - The specified ones from Brian are the MUR1560, which are 600V 15A ultra fast diodes. The schematic in the F4 manual states of 35A 200V bridge. The other option is an IXYS HiPerFRED Epitaxial diode DSEP 12-12A. The IXYS seems more favourable as it can handle higher voltages at 1200V and has a faster recovering time at 40 nS. Looking at Mouser, I also found IR 15EYX06, 30ETH06 and 15ETH06 interesting as their recovering times are 18, 28 and 22 nS respectively. This will require more research.
- Capacitors - I can find three main choices; Panasonic TSHA, Mundorf SI and Nichicon KG Snap in.
- Filter Resistors - This can either be a parallel group of 0R47 5W resistors, or a low value inductor. For the resistor option, Mills MRA-5 and the Caddock MP915 15W seems to be the most sensible options. But only the Mills is available in the 0R47, and that from Parts Connexion... This is important as it also is the resistor on the source (?) of the MOSFET and I would like to get them in bulk, since there will be so many, 14x4 = 48 in total. The use of a very low mH range inductor here as an alternative may be as much an economical one, as a design choice. the Hammond 159ZJ 10mh/5A or the 159ZL 2.5mH/10A are around US$26 each, where as Caddock resistors will be in the range of US$20 and Mills around US$10. The question is, will a choke be a better design choice.
- Transformer - Amplimo makes a suitable 500VA range. That should be more than adequate for 1 channel. But at Euro 94.96, it ain't cheap. Even moving down to the 300VA range, is still Euro 70.45 each. I will need 4 such transformers.
Signal:
- Resistors - For the source resistors, see above. The gate resistors and other signal resistors will be something like a Tantalum, Carbon composition or Charcroft type. The other supporting resistors will be high quality Takman, Kiwame, Amtrans or similar.
- Capacitors C1, C2 - Appear to be signal coupling capacitors, connecting directly to the gate resistors. Something more special needs to go in this place, possibly an electrolytic with a high quality film bypass. Nichicon ES Muse may be a starting point. Maybe a Mundorf Bipolar as an option. The board only has minimal space for the coupling capacitor, a Mundorf Tin or a small value copper in paper oil maybe possible. Given the feedback about Teflon capacitors and this design, I want to stay away from this combo, and keep towards a metal foil type.
- Capacitors C3, C4 - Seem to be power supply only, nevertheless, something like a high end Nichicon KZ or a Sanyo Os-con will do nicely.
Saturday, 30 April 2011
Reminder about 20% off Front Panel Express
A reminder that you and I can both get 20% off our next order at Front Panel Express by entering the code "M4VZCMD7" until June 30th.
Friday, 29 April 2011
The journey to the Pass Labs F4
Having set a path forward with the headphone side of my audio setup, I thought it appropriate time to look back at the stereo setup. I am quite satisfied at the current crop of speakers sitting in boxes, ready to be mounted onto cabinets. With a move to a home with a more fitting stereo room, I think it would make an ideal start in comparison of the speakers.
In this same vein, I have started to review the amps. I have a range of 1W and 8W tube amps ready to be assembled and tested. At the moment, most of my speaker drivers are in the 95 db+ range, and can be considered efficient, with the exception of the Jordan JX92s.
Reading through the various articles about amplifiers in the voltage and current domains, my conclusion (which is very similar to many others) is that tubes are excellent voltage gain devices. They work primarily in the voltage domain. To get them to power speakers, one has to convert some of the voltage into current, hence step down transformers. The output transformer takes, typically, hundreds of volts and milliamps, and transforms that into tens of volts and potentially tens of amps. This is then able to drive a speaker.
Though I have not much been interested in MOSFETS or transistors for amplifying devices, there seems to be a movement towards using them where their strength lies, in the high current domain. In a sense, they operating in tens of volts and tens of amps (or thereabouts). Most popular power amps are of the transistor type, and are able to produce hundreds of watts of power.
The debate between what is better; tubes or transistors, I think will never be concluded, as it is a function of taste. Each to their own. So far, I have experienced primarily tubes, and I like them not only for their sound, but their nostalgia and appearance. For me, a glowing red tube is so much more attractive than a massive heat sink. The fundamental problem, taking aside taste, is one of power. Tubes cannot really go above 100W, and if we limit ourselves to the single ended affair, probably not above 30W, sensibly.
I think what I, and other SET fanatics crave is more power. The only way to achieve that is to operate the tubes at an ever higher voltage and current. I have not found tubes that really work well in 16W plus in SE operation that operates at less than 800V. The 6C33 is close, but operates at a very high current of around 400 mA. The high current represents its own problem in transformers and chokes.
Fundamentally, what I have come to understand is nothing new, or earth shattering. However, it was important that one reach that conclusion in one's own time and way. My tastes at the moment favour; Single tube SE or one tube pair PP, both in Class A. Further, my goal would be 32 Wrms of clean power, irrespective of speaker efficiency.
Now that I am at this point, I find that I have two paths to move forward with. First path is with a high voltage SET, like the GM70, 211, 845 or similar transmitter tube. The other, a hybrid solution mating a tube front end with a transistor output stage.
Since I have ruled out high voltages, that only leaves the second path, one of a hybrid approach. Having only casually explored the hybrid path, I have come across the Moskido design, which is a hybrid of the Aikido design with a MOSFET output stage. The other design is one of a booster amplifier, after a tube output amp. Having further researched this idea, I came across two interesting solutions; DIY Hifi Supply Fusion module and the Pass Labs F4 impedance converting amplifier.
The Fusion module seems to be very easy to implement, with the addition of a low voltage power supply and the insertion of the module. It looks like a current amplifier that is probably in parallel with the speaker. It probably includes some kind of Class D chipamp operating as a current amplifier.
The F4 is more interesting. Now only has it got some really good reviews, it is a similar approach as with Andrea Ciuffoli in his "100W Hi End Hybrid" design. Any which way, they are both interesting approaches and designs. The F4 has a cult following in the DIY Audio community, and there are PCB boards available as well as volumes of forum postings about this. For me, that makes it a safer design, as it can be supported by a range of people who have built it.
Having come to this conclusion, I ordered 2 sets of the PCB boards from the DIY Audio Forum store. Also ordered the matching number of sets of the active devices from Tech DIY. I hope to start the build soon, and share what I have research and progress to date.
Thursday, 28 April 2011
Completed the Elekit TU-882
 Last night, I had the opportunity and time to fully assemble and complete the last steps of the Elekit TU-882R headphone amp. Firstly, I have to say that the quality of components and fit are top rate. The chassis work is extremely nice, though it may not be your taste, one cannot complain about the quality. I myself, like it, and will most likely leave the tube guard off, as I like to look at the tubes, and also do some tube rolling. More on that later.
Check out the progress build photos below. You will notice that I have put to use the stock 0.1uF polypropylene coupling caps to good use. I have used them as the PSU electrolytic shunting.
I had about one hour last night to listen to the amp before I had to retire for the night. Firstly, it worked! On first impression, the sound is quite relaxed, but what I noticed most was the bass control. A lot firmer than the Ear+. Anyway, more on that later, but I discovered an interesting problem.
 There is sever noise or ground contamination. This is the situation. When the volume is all the way down, I can hear hum on both channels. Relatively loud, and doesn't go away when I connect or disconnect the source, or when I touch the chassis. When I turn the volume 2 clicks on, I can hear some strange buzzing on the left channel, with the hum still on in the background. As I turn the volume up, the buzzing doesn't get any louder. Until about the top two clicks, the buzzing disappears immediately, and is replaced with noise on both channels (the white random kind). I can still hear the buzzing at the top three clicks, but it is getting progressively softer. Meanwhile, the noise is also getting softer the further away from full volume, within the first 2 or 3 clicks, it is gone.
The strange buzzing is heard through the music, quite annoying. Now, I did not use the stock supplied PCB for the volume control, and this may be attributed to that, but I am sure it has something more to do with the ground scheme. Perhaps, I have to get the saw out earlier to get the IEC with a proper ground connection done sooner. Anyway, will be speaking with Victor about this, and see if he has come across this before, and find a solution.
Otherwise, this has spoilt a good and fun kit to build. And whilst the music is playing, but minus the buzz or hum, it is quite enjoyable and pleasant. More to come soon!


Wednesday, 27 April 2011
Progress on the TU882
After having received the resistors earlier today, I actually found some time to progress the build further. Check out the photos below. I found that it was best to pre-tin all the wires before installing them. I also note that there wasn't an Australian lead supplied, and it has no earth connection. This is something that does concern me, as I want to make sure the equipment is safe, with kids around. I might look into modifying the kit once complete to add a proper IEC three terminal connection to allow for a ground connection. Otherwise everything went very smoothly.


Final Resistors Arrived!
Very excited, the final missing resistors for the TU882R build arrived this morning. Hopefully time for the build later today, and maybe finish by the weekend!
Saturday, 16 April 2011
Progress Build of TU882R
 |
| The main board, without the missing 4 resistors, tube sockets and the wiring. |
During the build, as per normal, I realised that I ordered the replacement resistors four less then what was needed. I was short 220k and the 3k3. So, immediately placed another order for these missing four resistors, but continued to build.
 |
| Close up of the signal part of the PCB. Note the Mundorf caps and the Tantalum resistors |
 |
| Close up of the main PCB signal section, note that both the Mundord caps and the Tantalum resistors stand off the PCB by a bit, as they were larger than what was supplied |

Have a look at the photos below of the progress. The instructions was simple to follow and straight forward. The PCB has good room, and the solder pads weren't too small. Everything fit and as you can see, I am just waiting on the replacement resistors before I do the assembly, wiring and chassis part of the kit.
 |
| The front panel sockets PCB. |
 |
| Front Panbel sockets PCB showing the header pins. |
 |
| The replacement Noble pot. This will be direct wired from the pot to the PCB, not requiring PCB 'B'. |
 |
| The PSU/Transformer PCB. |

Thursday, 14 April 2011
Additional technical data on Beyma 15XA38Nd
Having requested a few bits of additional information from Beyma regarding the compression driver unit, they kindly responded quickly and I post this information that has been kindly provided by Beyma. They are all associated with the HF unit (or compression driver) on the 15XA38Nd. Also of note, I received a confirmation from Europe Audio regarding the shipping of the drivers, and I look forward to their arrival next week via FedEx.
DC Resistance (Re) of the HF Unit = 10.05 R
DC Resistance (Re) of the HF Unit = 10.05 R
 |
| Impedance vs Frequency |
 |
| Lvc vs Frequency |
Friday, 8 April 2011
Disappointment
Have been thinking about whether I wanted to write this post or not. I am not wanting to spread false rumours, but want to share with you the fact, and what happened in my experience. Now, I have been buying items from the Internet for over 10 years, I have generally had very good service from all the various vendors. In particular, I have had great experiences from online DIY suppliers such as (in no particular order); Welborne Labs, Bottlehead, Maple Tree Audio, DIY Hifi Supply, Sowter, K and K Audio, Chipamps, eBay, Hifi Collective, Tube Depot, Audio Tubes, Tango Tubes, Angela, Beezar, Front Panel Express, Digikey, Mouser, Allied Electrical and Farnell (now Element 14). Partsconnexion would've been a part of that list, until my last order.
This particular order included most of the upgrade parts for the Elekit, which included the 3k3 Tantalum resistors. For whatever reason, after I selected this correctly in the online shopping cart, they did not transpose that correct to their invoice. Instead, they put in 4k3. And with them, they send you the invoice to confirm first before they take payment and ship. I opted for the UPS option, which for a bunch of resistors and a pot, cost around US$60. Well, the time between when they sent me the invoice, and the shipping confirmation, was around one hour, and it occurred in Australia time, around 4am in the morning. Not much time for someone to respond.
So, to my surprise when I opened the package, I did not find my 3k3, but instead found the 4k3. I emailed them immediately, along with the web invoice email confirmation that I got first. They were very quick and nice to respond. Long story short, after a few emails, they were happy to send me the replacement resistors, but only after I have sent them back and they received it. Also, they were silent on the shipping method they would use.
To me, that is where they lost me. Firstly, it was their mistake, and secondly, why should I send back something before I got what I paid for? Well, I have encountered this scenario with a few other suppliers mentioned above, and in ALL instances, they were willingly to ship the correct goods first. Not after.
Well, that is my rant for the week. Take from it what you will. I am not warning anyone to stay away from Partsconnexion, but just sharing my experience. They do have an excellent range of components and are very well priced. But what about the service?
Subscribe to:
Posts (Atom)