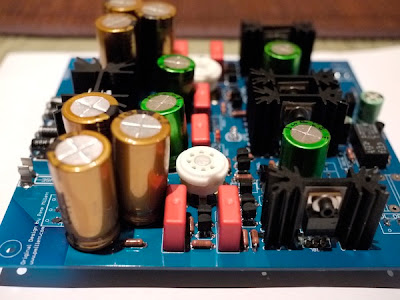
After a a few day's worth of soldering and assembly, the amp is finally working! As usual, the assembly work took longer than the PCB assembly itself. See some of the photos below for the progress builds. The biggest mistake I made was to solder the fuse clips on the wrong side of the board. Now I have to remove the PCB fully to be able to change the fuse. On hindsight, that may be a good thing, as a blow fuse would usually mean more of a problem down stream. So having to remove the PCB also forces me to have a quick check of the PCB itself.
 The wiring for the volume control, crossfeed, etc was all done with solid silver wire and the use of tabs. Although this took a very long time, the results are well worthwhile. Using 24 AWG meant that I had to strip the teflon insulation off very carefully, otherwise any slight cut/scratch of the wire will cause it to break off when it is bent.
Biasing and setting up the amp wasn't too difficult. The B+ adjustment was straight forward, and I biased it to 25.6V, and it is now hovering around 25.58V. The diamond buffer bias is set at 100mA at present. Reading through the advice, I will leave this at this setting for a few weeks of use and then revisit after that. I want to let the various capacitors, resistors and transistors break-in. The tube bias was quite straight forward. At present, the channel imbalance doesn't seem too bad, and both channels are well balanced.
Once everything was biased and running for around a minute after that, I did the measure of the DC offset at the outputs. It was measured around 0.1mV. Not too bad at all! Everything appeared to be in good order. The heatsinks were getting warm, but only slightly so. With the diamond bias below their recommended levels, I'd assume that it isn't doing as hard work as it was designed to, and running cooler.
Once the final assembly was completed, I hooked them up with my test pear of cheap Sennheiser ear-buds. I first noticed a little hum, but it was not too loud. Connecting my test iPod up to the amp, I waited for the delay relay to kick in. Music! The sigh of relief was immense when sound was coming out of the ear buds! After letting this run in for about ten minutes, I powered off the amp to change to my usual cans, the HD650.
The sound, in short, was amazing. The hum had disappeared. Not sure whether that was from moving the temporary power cables around, or from a different headphone, or whatever, it was gone. Dead quiet, and this was late at night with very little ambient sounds. Fantastic! Powering through music, the first conclusions I made was; I did not like the crossfeed. At this time, I am not sure if the crossfeed was causing the first problem, or whether it was wrong wiring.
Using the crossfeed for the first time, I found that it muted the highs and made the sound very flat and even a little restricted. Turning it off made the sound more fuller and far more enjoyable. I was thinking that I probably should've tried the crossfeed before on another amp and would've saved many hours. Maybe, the caps need some time to open up, but at the moment, I think I will be listening without the crossfeed. I did not notice any widening of the soundstage or it moving from the off position. I think my ears/brain probably doesn't respond to the crossfeed at all.
Regardless of the issue mentioned above, the sound was amazing. The bass was awesome, very authoritative, and I have never really heard such clean and articulate bass before (headphones or speakers). It was almost scary. The mids was warm and clear and the highs crystal clear. All in all, a great sound. I think there will be no need for any bass boost. The balance at this moment, is very good to my ears.
At the end, I used both a Vitamin-Q and a Vishay MK1837 as a bypass on the output capacitors, and though only have less then 1 hour, the sound is already amazing. Looking forward to seeing them break in and get better over time. Part of me still wanted to try the Mundorf Silver-oil caps, but the leads were too thick, and I was in no mood to do any more modifications yet.
Overall, very impressed with the sound and quality. The remaining actions are:
- Remove Crossfeed
- Build legs to raise chassis off the ground to allow air flow inwards from bottom.
- Possibly install a few more LED to create a more glowing effect.
The photos below show the construction of the PCB with the most of the components installed. It also shows all the trimmers and terminal blocks on the bottom to allow for easy access and adjustment without having to remove the entire amp.


Below are the diamond buffer devices mounted on the heatsinks, ready for installation.

Below are some shots of the completed PCB. Note the Vitamin-Q mounted on the bottom of the board.


A few shots of the assembled amp. Note all the hook-up wires from the cross-feed to the switches and the various input and out connections. It was such a shame that I did not like the cross-feed and most likely remove it eventually.


Below the completed amp ready for power-up and first use.

No comments:
Post a Comment